Everything is Talkative: Unterschied zwischen den Versionen
| (18 dazwischenliegende Versionen desselben Benutzers werden nicht angezeigt) | |||
| Zeile 1: | Zeile 1: | ||
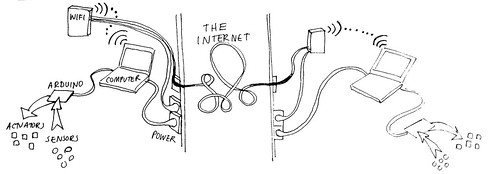
We like to embed electronics in everything these days, and while we’re at it why not include wifi so that everything can communicate with everything via The Internet. | We like to embed electronics in everything these days, and while we’re at it why not include wifi so that everything can communicate with everything via The Internet. | ||
= E X A M P L E S= | = E X A M P L E S= | ||
== ARDUINO | == ARDUINO <-- Serial --> PROCESSING == | ||
https://live.staticflickr.com/65535/51112384011_2b0f4a0673.jpg | |||
1 download and install newest version of Processing (https://processing.org) | 1 download and install newest version of Processing (https://processing.org) | ||
| Zeile 10: | Zeile 14: | ||
2 download and install newest version of Arduino (https://www.arduino.cc) | 2 download and install newest version of Arduino (https://www.arduino.cc) | ||
3 | Now that you know a bit about [[Netzwerke]], take a look at the Arduino Serial library functions: | ||
file:///C:/Program%20Files%20(x86)/Arduino/reference/www.arduino.cc/en/Reference/Serial.html | |||
and the Processing Serial Library functions: | |||
file:///C:/Users/hanna/OneDrive/Documents/processing-3.5.4/modes/java/reference/libraries/serial/index.html | |||
and this overview is wonderful: | |||
https://learn.sparkfun.com/tutorials/connecting-arduino-to-processing/all | |||
Arduino and Processing have a set of examples that demonstrate sending data back and forth between them. | |||
=== SerialCallResponse === | |||
ARDUINO > open > examples > communication: SerialCallResponse | |||
this Arduino example code uses the function: | |||
Serial.write(sensorValue); // Writes binary data to the serial port. This data is sent as a byte or series of bytes. | |||
file:///C:/Program%20Files%20(x86)/Arduino/reference/www.arduino.cc/en/Serial/Write.html | |||
the Processing example code then uses the following function to read the value: | |||
int inByte = myPort.read(); | |||
=== SerialCallResponseASCII === | |||
ARDUINO > open > examples > communication: SerialCallResponseASCII | |||
this Arduino example code uses the function: | |||
Serial.print(sensorValue); // Prints data to the serial port as human-readable ASCII text. | |||
the Processing example code then uses the following functions to read and trim the incoming value: | |||
String myString = myPort.readStringUntil('\n'); | |||
myString = trim(myString); // removes any bytes other than the linefeed | |||
int sensors[] = split(myString, ','); // split the string at the commas | |||
you can also convert the String to an Integer at the same time: | |||
int sensors[] = int(split(myString, ',')); // split the string at the commas and convert the sections into integers | |||
== PROCESSING <-- OSC --> PROCESSING == | == PROCESSING <-- OSC --> PROCESSING == | ||
https://live.staticflickr.com/65535/51113165680_ac1eacb9ec.jpg | |||
=== INSTALL : PROCESSING OSC LIBRARY === | |||
1) in the Processing top menu go to: “Sketch” –> “Import Library” | |||
2) type “OSC” in the search box | |||
3) select the OSC library | |||
4) click on “Install” | |||
== CHALLENGE: Arduino <-- Serial --> PROCESSING <-- OSC --> PROCESSING <-- Serial --> Arduino == | |||
https://live.staticflickr.com/65535/51112291028_6e0a2609f9.jpg | |||
== PROCESSING <-- MQTT(shiftr.io) --> PROCESSING == | == PROCESSING <-- MQTT(shiftr.io) --> PROCESSING == | ||
https://live.staticflickr.com/65535/51113165805_c44ac0fb84.jpg | |||
=== INSTALL : PROCESSING MQTT LIBRARY === | === INSTALL : PROCESSING MQTT LIBRARY === | ||
1) in the Processing top menu go to: “Sketch” –> “Import Library” –> “Import Library” | 1) in the Processing top menu go to: “Sketch” –> “Import Library” –> “Import Library” | ||
| Zeile 37: | Zeile 103: | ||
4) click on “Install” | 4) click on “Install” | ||
see also: https://www.shiftr.io/try?lang=processing | see also: https://www.shiftr.io/try?lang=processing | ||
==== ARDUINO <-- Serial --> PROCESSING <--- MQTT ---> PROCESSING <-- Serial --> ARDUINO ==== | ==== ARDUINO <-- Serial --> PROCESSING <--- MQTT ---> PROCESSING <-- Serial --> ARDUINO ==== | ||
www.youtube.com/embed/8nRm6WNk57I | www.youtube.com/embed/8nRm6WNk57I | ||
== ARDUINO ESP32 <-- MQTT(shiftr.io) --> PROCESSING == | == ARDUINO ESP32 <-- MQTT(shiftr.io) --> PROCESSING == | ||
=== INSTALL: ARDUINO ESP32 HARDWARE === | === INSTALL: ARDUINO ESP32 HARDWARE === | ||
1 Menu: Preferences —> Additional Boards Manager URLs: | 1 Menu: Preferences —> Additional Boards Manager URLs: | ||
https://dl.espressif.com/dl/package_esp32_index.json | https://dl.espressif.com/dl/package_esp32_index.json | ||
2 Menu: Tools —> Boards —> Boards Manager: | 2 Menu: Tools —> Boards —> Boards Manager: | ||
search for: “ESP32” | search for: “ESP32” | ||
Install: “esp32 by Espressif Systems” | Install: “esp32 by Espressif Systems” | ||
3 Menu: Tools —> Board: ESP32 Dev Module | 3 Menu: Tools —> Board: ESP32 Dev Module | ||
Menu: Tools —> Port: dev/cu… | Menu: Tools —> Port: dev/cu… | ||
(unplug and plug to see which port appears) | (unplug and plug to see which port appears) | ||
Menu: Tools —> Flash Mode: QIO | Menu: Tools —> Flash Mode: QIO | ||
Menu: Tools —> Flash Size: 4MB | Menu: Tools —> Flash Size: 4MB | ||
Menu: Tools —> Flash Frequency: 80Mhz | Menu: Tools —> Flash Frequency: 80Mhz | ||
Menu: Tools —> Upload Speed: 115200 | Menu: Tools —> Upload Speed: 115200 | ||
=== INSTALL : ARDUINO MQTT LIBRARY === | === INSTALL : ARDUINO MQTT LIBRARY === | ||
1 Menu: Sketch —> Include Library —> Manage Libraries | 1 Menu: Sketch —> Include Library —> Manage Libraries | ||
| Zeile 73: | Zeile 151: | ||
see also: https://www.shiftr.io/try?lang=arduino | see also: https://www.shiftr.io/try?lang=arduino | ||
=== TEST: ESP ARDUINO CONNECTION === | === TEST: ESP ARDUINO CONNECTION === | ||
Menu: File —> Examples —> Basics —> “Blink” | Menu: File —> Examples —> Basics —> “Blink” | ||
edit: LED_PIN = 2; | edit: LED_PIN = 2; | ||
—> blue LED should blink on/off | —> blue LED should blink on/off | ||
=== TEST: ESP SENSOR CONNECTION === | === TEST: ESP SENSOR CONNECTION === | ||
READ ANALOG SENSOR | READ ANALOG SENSOR | ||
Menu: File —> Examples —> Communication —> “Graph” | Menu: File —> Examples —> Communication —> “Graph” | ||
edit: Serial.begin(115200); | edit: Serial.begin(115200); | ||
edit: pick a GPIO pin with and ADC | edit: pick a GPIO pin with and ADC | ||
(GPIO = General Purpose In Out) | (GPIO = General Purpose In Out) | ||
(ADC = Analog Digital Converter) | (ADC = Analog Digital Converter) | ||
for example: analogRead(34); | for example: analogRead(34); | ||
| Zeile 96: | Zeile 185: | ||
edit: your wifi info: | edit: your wifi info: | ||
your network name / SIID | your network name / SIID | ||
(SIID = Service Set Identifier) | (SIID = Service Set Identifier) | ||
your password | your password | ||
edit: the “ClientID” so that you can see yourself connect: | edit: the “ClientID” so that you can see yourself connect: | ||
client.connect(“ClientID”, “try”, “try”) | client.connect(“ClientID”, “try”, “try”) | ||
edit: the topics you subscribe and publish to by adding “/yourName” | edit: the topics you subscribe and publish to by adding “/yourName” | ||
you can also change the “message” you are sending! | you can also change the “message” you are sending! | ||
| Zeile 112: | Zeile 206: | ||
https://live.staticflickr.com/65535/49856212336_cf2c240d1e_c.jpg | https://live.staticflickr.com/65535/49856212336_cf2c240d1e_c.jpg | ||
https://live.staticflickr.com/65535/49856212466_3997636a84_c.jpg | https://live.staticflickr.com/65535/49856212466_3997636a84_c.jpg | ||
[[https://live.staticflickr.com/65535/49856212336_cf2c240d1e_c.jpg|100px|MQTT diagram]] | |||
https://live.staticflickr.com/65535/ | |||
Aktuelle Version vom 13. April 2021, 16:33 Uhr
We like to embed electronics in everything these days, and while we’re at it why not include wifi so that everything can communicate with everything via The Internet.
E X A M P L E S
ARDUINO <-- Serial --> PROCESSING

1 download and install newest version of Processing (https://processing.org)
2 download and install newest version of Arduino (https://www.arduino.cc)
Now that you know a bit about Netzwerke, take a look at the Arduino Serial library functions:
file:///C:/Program%20Files%20(x86)/Arduino/reference/www.arduino.cc/en/Reference/Serial.html
and the Processing Serial Library functions:
file:///C:/Users/hanna/OneDrive/Documents/processing-3.5.4/modes/java/reference/libraries/serial/index.html
and this overview is wonderful:
https://learn.sparkfun.com/tutorials/connecting-arduino-to-processing/all
Arduino and Processing have a set of examples that demonstrate sending data back and forth between them.
SerialCallResponse
ARDUINO > open > examples > communication: SerialCallResponse
this Arduino example code uses the function:
Serial.write(sensorValue); // Writes binary data to the serial port. This data is sent as a byte or series of bytes.
file:///C:/Program%20Files%20(x86)/Arduino/reference/www.arduino.cc/en/Serial/Write.html
the Processing example code then uses the following function to read the value:
int inByte = myPort.read();
SerialCallResponseASCII
ARDUINO > open > examples > communication: SerialCallResponseASCII
this Arduino example code uses the function:
Serial.print(sensorValue); // Prints data to the serial port as human-readable ASCII text.
the Processing example code then uses the following functions to read and trim the incoming value:
String myString = myPort.readStringUntil('\n');
myString = trim(myString); // removes any bytes other than the linefeed
int sensors[] = split(myString, ','); // split the string at the commas
you can also convert the String to an Integer at the same time:
int sensors[] = int(split(myString, ',')); // split the string at the commas and convert the sections into integers
PROCESSING <-- OSC --> PROCESSING

INSTALL : PROCESSING OSC LIBRARY
1) in the Processing top menu go to: “Sketch” –> “Import Library”
2) type “OSC” in the search box
3) select the OSC library
4) click on “Install”
CHALLENGE: Arduino <-- Serial --> PROCESSING <-- OSC --> PROCESSING <-- Serial --> Arduino
PROCESSING <-- MQTT(shiftr.io) --> PROCESSING

INSTALL : PROCESSING MQTT LIBRARY
1) in the Processing top menu go to: “Sketch” –> “Import Library” –> “Import Library”
2) type “MQTT” in the search box
3) select the MQTT library by Joel Gaehwiler
4) click on “Install”
see also: https://www.shiftr.io/try?lang=processing
ARDUINO <-- Serial --> PROCESSING <--- MQTT ---> PROCESSING <-- Serial --> ARDUINO
www.youtube.com/embed/8nRm6WNk57I
ARDUINO ESP32 <-- MQTT(shiftr.io) --> PROCESSING
INSTALL: ARDUINO ESP32 HARDWARE
1 Menu: Preferences —> Additional Boards Manager URLs:
https://dl.espressif.com/dl/package_esp32_index.json
2 Menu: Tools —> Boards —> Boards Manager:
search for: “ESP32”
Install: “esp32 by Espressif Systems”
3 Menu: Tools —> Board: ESP32 Dev Module
Menu: Tools —> Port: dev/cu…
(unplug and plug to see which port appears)
Menu: Tools —> Flash Mode: QIO
Menu: Tools —> Flash Size: 4MB
Menu: Tools —> Flash Frequency: 80Mhz
Menu: Tools —> Upload Speed: 115200
INSTALL : ARDUINO MQTT LIBRARY
1 Menu: Sketch —> Include Library —> Manage Libraries
2 search for: “MQTT”
3 Install: MQTT library for Arduino by Joel Gaehwiler
see also: https://www.shiftr.io/try?lang=arduino
TEST: ESP ARDUINO CONNECTION
Menu: File —> Examples —> Basics —> “Blink”
edit: LED_PIN = 2;
—> blue LED should blink on/off
TEST: ESP SENSOR CONNECTION
READ ANALOG SENSOR
Menu: File —> Examples —> Communication —> “Graph”
edit: Serial.begin(115200);
edit: pick a GPIO pin with and ADC
(GPIO = General Purpose In Out)
(ADC = Analog Digital Converter)
for example: analogRead(34);
Note: ADC2 pins cannot be used when Wi-Fi is used. So, if you’re using Wi-Fi and you’re having trouble getting the value from an ADC2 GPIO, you may consider using an ADC1 GPIO instead, that should solve your problem.
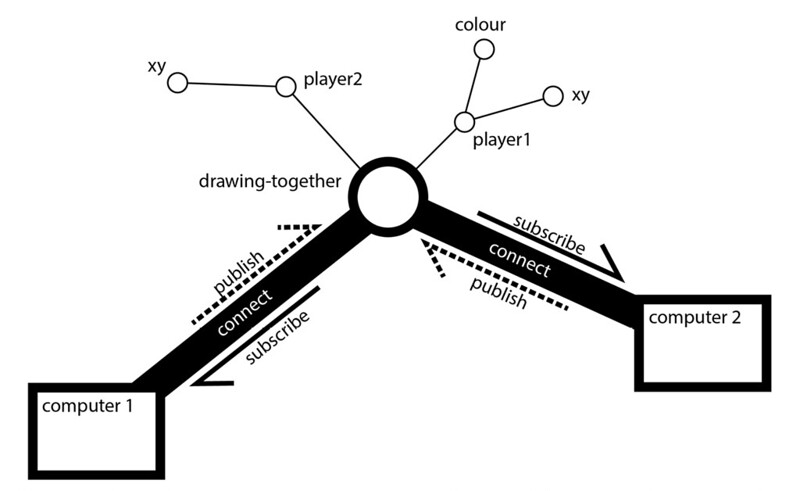
SEND: SENSORDATA OVER MQTT
Menu: File —> Examples —> MQTT —> ESP32DevelopmentBoard
edit: your wifi info:
your network name / SIID
(SIID = Service Set Identifier)
your password
edit: the “ClientID” so that you can see yourself connect:
client.connect(“ClientID”, “try”, “try”)
edit: the topics you subscribe and publish to by adding “/yourName”
you can also change the “message” you are sending!
client.subscribe(“/hello/yourName”);
client.publish(“/hello/yourName”, “message”);

 [diagram]