MQTT Brokers
see also: https://www.kobakant.at/DIY/?p=9140
BROKER OPTIONS
In general these are the different Broker options you have:
public online
- a public online Broker hosted by somebody else (for example: Shiftr "try" namespace, Mosquitto's "test" server)
private online
- an online service (free or paid) that allows you to host your own Broker (for example: Shiftr)
localhost
- a local Broker that you run on your own computer or a designated computer (like a Rasberry Pi) (for example: Shiftr Desktop App, Mosquitto)
SHIFTR BROKER
super nice and simple with amazing visualization! and all options from public and free to paid and private to desktop app.
Notes from working with Shiftr
SHIFTR ONLINE
Shiftr has an public online namespace called "try" where you can quickly and easyily start publishing and subscribing data: https://www.shiftr.io/try
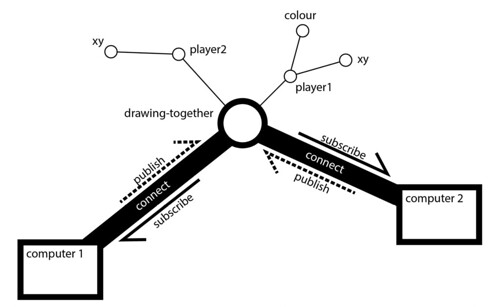
When you connect to this space with a Client, You should be able to see yourself pop up as your Client ID name (tip: pick a unique name to see yourself!). When you publish or subscribe data from the Broker you should see black balls flying from you to the center to the topic you are publishing to, or the other way around when you subscribe.

The visualization is interactive, you can click on nodes and pull them around to arrange the space. There is a lot going on here. If you want to use Shiftr for a project, you can create your own account for free and can have your own private or public namespaces.

Shiftr has libraries for various platforms including Arduino and Processing.
CLIENT: ARDUINO
To code an Arduino Client we use Shiftr's MQTT library for Arduino. There are other MQTT libraries for Arduino that would also work.
Install the Shiftr.io Arduino MQTT library: Sketch --> Include Library --> Manage Libraries --> search: "MQTT" the scroll down until you see "MQTT by Joel Gaehwiller"
Open the example: File --> Examples --> MQTT --> "ESP32DevelopmentBoard"
In the example code, enter your Wifi connection information:
const char ssid[] = "yourNetworkName"; const char pass[] = "yourNetworkPassword";
The client.connect function takes the following information: client.connect("client ID", "name of your instance", "token secret") It connects you to the online Shiftr Broker's public namespace called "try":
void connect() { while (!client.connect("arduino", "try", "try")) { ..... } }
The client.begin function takes the Broker's URL or IP: client.begin("URL or IP", net);
void setup() {
client.begin("broker.shiftr.io", net);
.... }
CLIENT: PROCESSING
To code a Proccessing Client we use Shiftr's MQTT library for Processing. Install Library: Sketch --> Import Library --> Add Library --> filter: "MQTT" install: "MQTT library for Processing based on the Eclipse Paho project by Joel Gaehwiller"
Open Example: File --> Examples --> MQTT --> "PublishSubscribe" The following line of code connects you to the online Shiftr Broker's public namespace called "try" with the Client ID "processing".
client.connect("mqtt://public:public@public.cloud.shiftr.io", "processing");
Notes: Make sure the URL in your code is the same as the current URL shown on the public namespace website: "mqtt://public:public@public.cloud.shiftr.io"
If you are using your own namespace, make sure you edit the URL to include name_of_your_instance
token_secret
url_of_your_instance
"mqtt://name_of_your_instance:token_secret@url_of_your_instance.cloud.shiftr.io"
SHIFTR Desktop App
You should be able to see your connections and data in the app, just like in the online visualization. Running this App means your computer is hosting a localhost MQTT broker. How cool is this! If you only need to send data locally, then you don't need to send it over the internet! All the devices publishing and subscribing just need to be in the same network (for example: connected to the same wifi network).

Download App for free: https://www.shiftr.io/desktop
To connect to this Broker, you need to find out the IP address of the computer running the App.
On a Mac: network settings --> Advanced --> TCP/IP --> IPv4 Address: 192.168.0.9 (for example)
CLIENT: ARDUINO
Download the Shiftr MQTT library (see above).
Open the Shiftr MQTT example (see above).
The following items in the code need to be changed. Leave the "name of your instance" and the "token secret" blank:
void connect() { //client.connect("client ID", "name of your instance", "token secret") while (!client.connect("arduino", "", "")) { ..... } }
Insert your IP address instead of the Shiftr URL:
void setup() { client.begin("192.168.0.9", net); .... }
CLIENT: PROCESSING
Download the Shiftr MQTT library (see above). Open the Shiftr MQTT example (see above).
Insert your IP address instead of the Shiftr URL: client.connect("mqtt://192.168.0.9", "processing”);