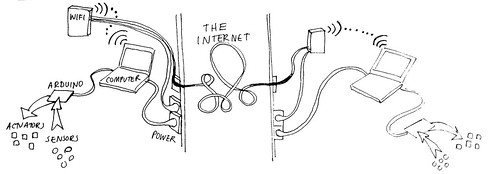
Everything is Talkative
We like to embed electronics in everything these days, and while we’re at it why not include wifi so that everything can communicate with everything via The Internet.
E X A M P L E S
ARDUINO <-- Serial --> PROCESSING

1 download and install newest version of Processing (https://processing.org)
2 download and install newest version of Arduino (https://www.arduino.cc)
Now that you know a bit about Netzwerke, take a look at the Arduino Serial library functions:
file:///C:/Program%20Files%20(x86)/Arduino/reference/www.arduino.cc/en/Reference/Serial.html
and the Processing Serial Library functions:
file:///C:/Users/hanna/OneDrive/Documents/processing-3.5.4/modes/java/reference/libraries/serial/index.html
and this overview is wonderful:
https://learn.sparkfun.com/tutorials/connecting-arduino-to-processing/all
Arduino and Processing have a set of examples that demonstrate sending data back and forth between them.
SerialCallResponse
ARDUINO > open > examples > communication: SerialCallResponse
this Arduino example code uses the function:
Serial.write(sensorValue); // Writes binary data to the serial port. This data is sent as a byte or series of bytes.
file:///C:/Program%20Files%20(x86)/Arduino/reference/www.arduino.cc/en/Serial/Write.html
the Processing example code then uses the following function to read the value:
int inByte = myPort.read();
SerialCallResponseASCII
ARDUINO > open > examples > communication: SerialCallResponseASCII
this Arduino example code uses the function:
Serial.print(sensorValue); // Prints data to the serial port as human-readable ASCII text.
the Processing example code then uses the following functions to read and trim the incoming value:
String myString = myPort.readStringUntil('\n');
myString = trim(myString); // removes any bytes other than the linefeed
int sensors[] = split(myString, ','); // split the string at the commas
you can also convert the String to an Integer at the same time:
int sensors[] = int(split(myString, ',')); // split the string at the commas and convert the sections into integers
PROCESSING <-- OSC --> PROCESSING

INSTALL : PROCESSING OSC LIBRARY
1) in the Processing top menu go to: “Sketch” –> “Import Library”
2) type “OSC” in the search box
3) select the OSC library
4) click on “Install”
CHALLENGE: Arduino <-- Serial --> PROCESSING <-- OSC --> PROCESSING <-- Serial --> Arduino
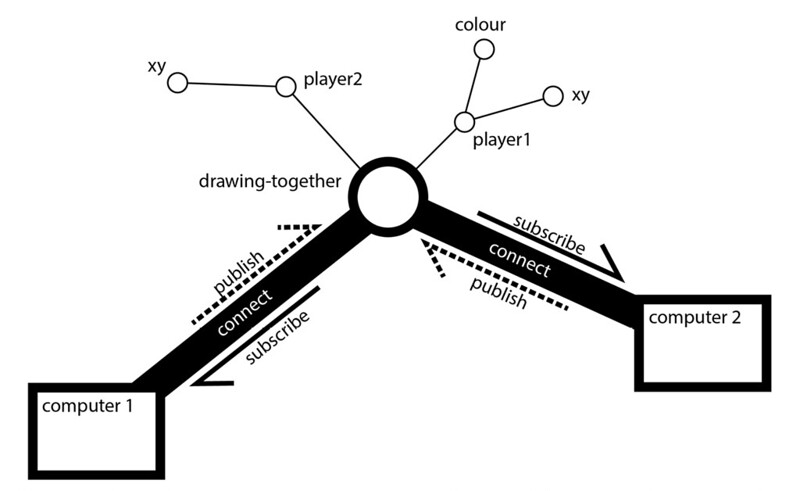
PROCESSING <-- MQTT(shiftr.io) --> PROCESSING

INSTALL : PROCESSING MQTT LIBRARY
1) in the Processing top menu go to: “Sketch” –> “Import Library” –> “Import Library”
2) type “MQTT” in the search box
3) select the MQTT library by Joel Gaehwiler
4) click on “Install”
see also: https://www.shiftr.io/try?lang=processing
ARDUINO <-- Serial --> PROCESSING <--- MQTT ---> PROCESSING <-- Serial --> ARDUINO
www.youtube.com/embed/8nRm6WNk57I
ARDUINO ESP32 <-- MQTT(shiftr.io) --> PROCESSING
INSTALL: ARDUINO ESP32 HARDWARE
1 Menu: Preferences —> Additional Boards Manager URLs:
https://dl.espressif.com/dl/package_esp32_index.json
2 Menu: Tools —> Boards —> Boards Manager:
search for: “ESP32”
Install: “esp32 by Espressif Systems”
3 Menu: Tools —> Board: ESP32 Dev Module
Menu: Tools —> Port: dev/cu…
(unplug and plug to see which port appears)
Menu: Tools —> Flash Mode: QIO
Menu: Tools —> Flash Size: 4MB
Menu: Tools —> Flash Frequency: 80Mhz
Menu: Tools —> Upload Speed: 115200
INSTALL : ARDUINO MQTT LIBRARY
1 Menu: Sketch —> Include Library —> Manage Libraries
2 search for: “MQTT”
3 Install: MQTT library for Arduino by Joel Gaehwiler
see also: https://www.shiftr.io/try?lang=arduino
TEST: ESP ARDUINO CONNECTION
Menu: File —> Examples —> Basics —> “Blink”
edit: LED_PIN = 2;
—> blue LED should blink on/off
TEST: ESP SENSOR CONNECTION
READ ANALOG SENSOR
Menu: File —> Examples —> Communication —> “Graph”
edit: Serial.begin(115200);
edit: pick a GPIO pin with and ADC
(GPIO = General Purpose In Out)
(ADC = Analog Digital Converter)
for example: analogRead(34);
Note: ADC2 pins cannot be used when Wi-Fi is used. So, if you’re using Wi-Fi and you’re having trouble getting the value from an ADC2 GPIO, you may consider using an ADC1 GPIO instead, that should solve your problem.
SEND: SENSORDATA OVER MQTT
Menu: File —> Examples —> MQTT —> ESP32DevelopmentBoard
edit: your wifi info:
your network name / SIID
(SIID = Service Set Identifier)
your password
edit: the “ClientID” so that you can see yourself connect:
client.connect(“ClientID”, “try”, “try”)
edit: the topics you subscribe and publish to by adding “/yourName”
you can also change the “message” you are sending!
client.subscribe(“/hello/yourName”);
client.publish(“/hello/yourName”, “message”);

 [diagram]